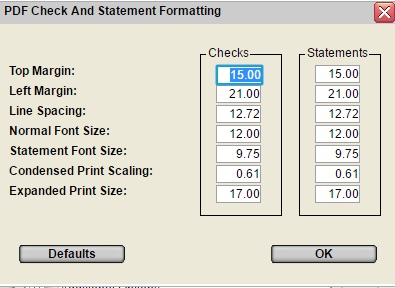
Sign On Screen -> Main Menu -> SET PRINTER button -> Printer Selection -> PDF SETTINGS button -> PDF Check and Statement Formatting
General Ledger Menu -> Checks ->Print G/L Computer Checks -> Start Check Print Confirmation Screen -> PDF SETTINGS button -> PDF Check and Statement Formatting
Accounts Payable Menu -> Payments -> Print A/P Computer Checks -> Start Check Print Confirmation Screen -> PDF SETTINGS button -> PDF Check and Statement Formatting
The Start Check Print Confirmation Screen window stores these PDF Print Settings by operator name so the next time that operator prints the job the same alignment applies.
In Open Client there is always a PDF SETTINGS
button to maintain statement and check print settings.
In the Windows Client the MARGINS button is changed
to a PDF SETTINGS button when the printer destination
is PDF or Email as PDF.

The settings window manages the following values for check and statement printing to PDF:
Left Margin:
This is the distance from the left side of the page to the first
character of text, where a page is 612 units wide.
Line spacing:
This is the spacing between the bottom of each line of text.
This value can be adjusted to correct the check alignment. Most
checks/printers align at 12.72 or if the remittance sections is
printing too low try 12.5
Normal font size:
This is the default font size and should be smaller than the line
spacing.
Statement font size:
This is the font size used for statement details, which is smaller
than normal but not condensed.
Condensed Print Scaling:
The font height is not changed.
Condensed font is printed with the same height as the "normal"
font, but compressed width-wise for readability.
Expanded print size:
This is the size of expanded print which is used in document
headers if not using forms.
To restore the default values displayed in the image above, click on the DEFAULTS button.
| Converted from CHM to HTML with chm2web Pro 2.85 (unicode) |