Sign On Screen -> Main Menu -> SET PRINTER button -> Printer Selection
Once the printers have been setup in System-Wide Printers and optionally in the
Divisional Printers for firms using the
"Operators by Division" feature, the printer can be selected for
this session by clicking on the Printer option in the menu
bar at the top of the windows screen.
Alternatively click the SET PRINTER button on the
Main Applications Menu.
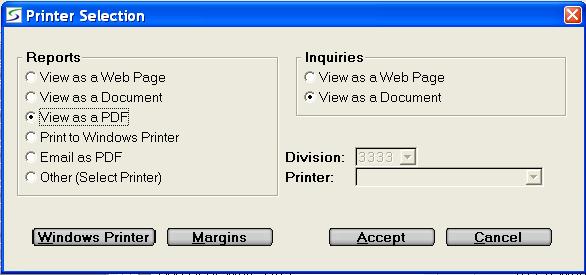
The current selections for Report output and for Inquiry results, are displayed.
Example of Printer Selection window from a Windows Client (MFC) for an "Operators by Division" company:

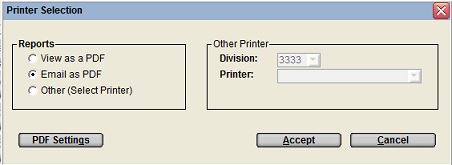
Example of Printer Selection window for "Open Client" session:

Open Client Restrictions:
On login to a Web App or Open Client session if the operator's
default printer selection is not one of the valid options, it is
automatically changed to View as PDF for this session, but
does not update this as the operator's default printer selection
for subsequent sessions.
If the operator manually changes the printer selection the new
selection does become the new default.
In a Web App or Open Client session the valid Other options must be "System Devices" such as:
Note: Pop-ups must be enable on the local browser to allow output to be printed to the screens
To select a different option, click the mouse on your new
choice, and then click the ACCEPT button.
The new printer choice will apply for this session until a
different selection is made again in this window.
View as a Document: opens the Report or Inquiry in
Microsoft Word.
These documents can then be saved or formatted as required.
This option does not apply to Open Client sessions.
View as a PDF: opens the Report or Inquiry in Adobe
PDF.
These documents can then be saved as required.
Note:If this default is not changed for North American customers, the Emailed PDF reports will be chopped off at the right margin.
Print to Windows Printer: prints the Report to the
default windows printer.
To confirm or change the default printer, click on the
WINDOWS PRINTER button as outlined below.
This option does not apply to Open Client sessions.
Email as PDF: triggers an email with an attachment of the
report or document in PDF format.
The operator is prompted for the subject and address information as
outlined in Email A File.
If the email is aborted or cancelled, the output is still generated as a PDF document.
Note: Associated documents such as 'Safety Sheets' are not emailed as they are stored on the Client.
Other (Select Printer): allows the operator to select from any of the print devices setup on the server and is geared more to Linux networks.
Note: This option only applies to firms using the "Operators by Division" feature, and does not display if "Operators by Division" is not activated.
Printer: provides the ability to view and select from the available print devices in System-Wide Printers or according to Division in Divisional Printers.
ACTIONS:
Additional actions provided by buttons on
the Printer Selection screen include:
The Choose Windows Printer window for this workstation
opens to select a printer.
The prompts include:
Set the Margin Sizes for the Paper:
Click the MARGINS button to set margin sizes, fonts,
and paper sizes, for the selected printer.
In the Select Printer to Edit window, select the printer from the drop-down list and click on the EDIT button.
Duplex printing can also be enabled for the selected printer if required from the Duplex Printing tab.
Set the Settings for the PDF printing:
Click the PDF SETTINGS button to set the margins,
spacing, fonts, and paper sizes, for the check and statement
printing in the PDF Check and Statement
Formatting.
This button is available on Open Clients, and on Windows Clients
for a printer selection using PDF format.
| Converted from CHM to HTML with chm2web Pro 2.85 (unicode) |